Privacy Filter Installation and Care
Note: This installation guide is designed for privacy screen protectors used on laptops, desktop monitors, and tablets. It does not cover mobile phone screen protectors. If you’re looking for mobile device filters, please refer to device-specific accessories.
What is a Privacy Screen Protector?
A privacy screen protector is a specially designed film or panel that limits the viewing angle of your screen, ensuring that only the person directly in front of the device can see its contents clearly. It’s essential for safeguarding sensitive information in public or shared spaces.
Laptop Privacy Screen Installation
Suitable for: MacBook or laptops with magnetic compatibility (typically with metal bezels or magnetic frame design)
Magnetic Privacy Filter Installation Video

Step-by-Step Installation
- Open your laptop and clean the screen with the provided microfiber cloth.
- Take the magnetic privacy screen out of the protective sleeve.
- Align the screen with the top edge of your laptop display.
- Gently place the magnetic privacy filter onto the screen; it will automatically snap into place.
- Adjust for proper alignment to ensure full screen coverage and clear viewing.
How to Remove
Gently lift from one corner and place the screen protector flat in a clean storage pouch.
Tips for Optimizing Use
- Perfect for users who frequently attach/detach the filter.
- Ensure your laptop has a magnetic-compatible bezel for best fit.
Suitable for: Laptops with a flat bezel around the display, and no raised or recessed edges between the bezel and screen.
Nano Frame Glue Privacy Filter Installation Video

Step-by-Step Installation
- Open your laptop and clean the screen thoroughly using the microfiber cloth.
- Peel off the protective liner around the nano glue frame on the privacy screen.
- Align the privacy screen with your laptop display, ensuring the glue frame contacts the bezel area.
- Gently press along the frame edges to activate the nano adhesive and secure attachment.
- Smooth the surface to remove bubbles and verify full contact.

How to Remove
Lift from one edge slowly.
Tips for Optimizing Use
- Provides a seamless, edge-to-edge appearance.
- Best for long-term use. Avoid frequent removal to preserve adhesion.
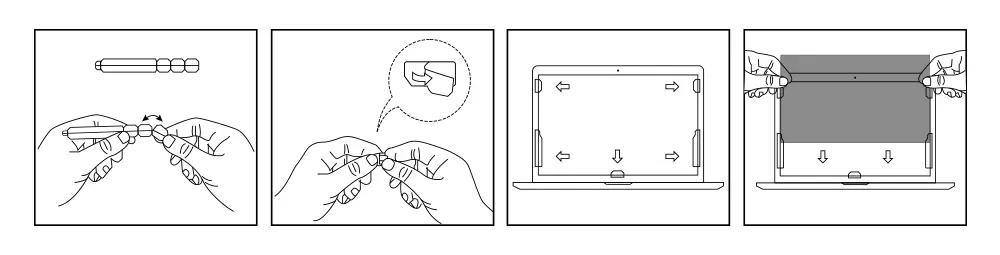
Suitable for: Laptops with a raised bezel, where the bezel height is higher than the screen, allowing the tabs to be inserted
Insert Privacy Filter Installation Video

Step-by-Step Installation
- Select the appropriate size slide mount tabs for your laptop screen.
- Attach the adhesive side of the large tabs to the left and right bottom corners of the laptop’s bezel.
- Select the smaller slide mount tabs and attach them to the middle positions of the left and right bezels, ensuring the adhesive sticks to the bezel.
- Slide the privacy filter down from the top of the screen into the track formed by the mounted tabs.
- Ensure the filter is securely in place and that no edges are lifting.
How to Remove
Slide the protector upward from the tabs and store safely.
Tips for Optimizing Use
- Tabs can be left attached for quick reuse.
- Perfect for shared or office-use laptops.
Suitable for: Laptops where adhesive application is not ideal, such as rental units or demo devices.
Step-by-Step Installation
- Open your laptop and wipe the screen surface with the microfiber cloth provided.
- Peel off the protective liner from the acrylic hanging tabs.
- Stick the tabs onto the top edge of the privacy screen (facing outward).
- Gently hook the privacy screen onto the laptop screen bezel using the tabs.
- Adjust the angle to ensure full screen coverage and clear visibility.
Click to watch the installation video for reference.
How to Remove
Lift the screen protector from the hooks and store safely when not in use.
Tips for Optimizing Use
- Best for occasional use, travel, or hot-desking scenarios.
- Not designed for rugged or continuous daily use.
Monitor Privacy Screen Filter Installation
Suitable for: Desktop monitors, where a permanent or semi-permanent attachment is desired
Step-by-Step Installation

- Clean the monitor screen with the microfiber cloth.
- Peel off the protective liner from the adhesive strips.
- Apply the adhesive strips around the edges of the screen, leaving space at the corners.
- Align the privacy filter with the screen and press it onto the adhesive strips.
- Ensure the filter is firmly attached and properly aligned.
How to Remove
Gently peel the screen protector away and clean any adhesive residue with a screen-safe cleaner.
Tips for Optimizing Use
- Ensure all four sides are properly aligned before pressing.
- Not recommended for frequent removal.
Suitable for: Desktop monitors, especially for setups that require non-adhesive or frequently removable filters.
Hanger Type Installation Video

Step-by-Step Installation
- Clean the surface of your monitor with the included microfiber cloth.
- Remove the protective film from the acrylic hanging tabs.
- Affix the tabs to the top edge of the privacy filter.
- Gently hang the privacy screen over the top of your monitor.
- Adjust the alignment so the filter covers the display area accurately.
How to Remove
Lift the screen protector up and off the hanger tabs. Store in a flat case.
Tips for Optimizing Use
- Easy to install without any residue or tools.
- Great for shared workstations or public display setups.
Suitable for: Desktop monitors with a raised bezel, where the bezel height is higher than the screen.
Step-by-Step Installation

- Select the appropriate size slide mount tabs based on the size of your widescreen monitor.
- Attach the adhesive side of the large tabs to the left and right bottom corners of the monitor’s bezel.
- Choose the smaller slide mount tabs and attach them to the middle positions along the left and right bezels of the monitor.
- Slide the privacy filter down from the top of the screen into the track created by the mounted tabs.
- Ensure the privacy filter is securely attached and properly aligned with the screen.
How to Remove
Slide the protector up and out from the tabs. Leave tabs in place for reuse.
Tips for Optimizing Use
- Good for semi-permanent office use with minimal visual impact.
- Ensure bezels are raised enough to hold the tabs securely.
Tablet Privacy Filter Installation
Suitable for: Tablets with a visible bezel and flat surface around the display area, without any step height differences.
Installation Video
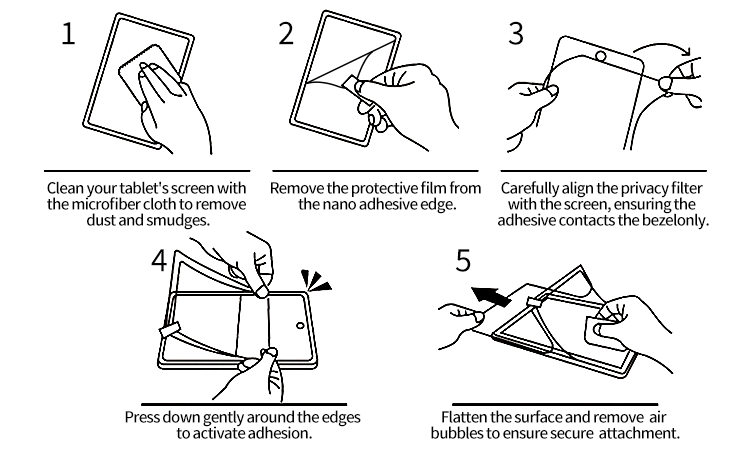
Step-by-Step Installation
- Clean your tablet’s screen with the microfiber cloth to remove dust and smudges.
- Remove the protective film from the nano adhesive edge.
- Carefully align the privacy filter with the screen, ensuring the adhesive contacts the bezel only.
- Press down gently around the edges to activate adhesion.
- Flatten the surface and remove air bubbles to ensure secure attachment.
How to Remove
Carefully lift from one edge and pull slowly.
Tips for Optimizing Use
- Provides edge-only adhesion, preserving clarity.
- Not recommended for frequent reapplication.
Suitable for: Tablets with a flat screen and clean, smooth surface without any curves or irregular edges.
Installation Video
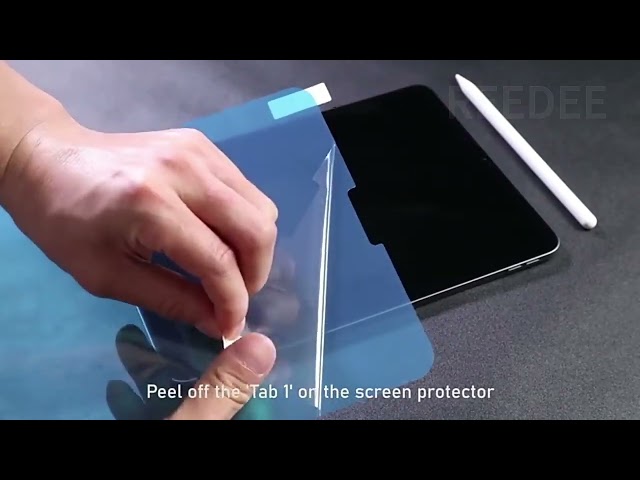
Step-by-Step Installation
- Clean the screen thoroughly with a microfiber cloth to remove dust, smudges, and oil.
- Peel off the protective film from the silicone adhesive side of the screen protector.
- Align the protector with the screen edges carefully before placing it down.
- Gently place the protector onto the screen — the silicone layer will automatically adhere and expel air as it settles.
- If small bubbles remain, press them outward with a card or your fingers; most will disappear on their own within a few hours.
How to Remove
Peel gently from one corner.
Tips for Optimizing Use
- Full screen bonding, best for permanent use.
- May slightly affect touch sensitivity on some devices.
Suitable for: Tablets, where a permanent or semi-permanent attachment is desired
Step-by-Step Installation
- Clean the tablet screen with the microfiber cloth.
- Peel off the protective liner from the adhesive strips.
- Apply the adhesive strips around the edges of the screen, leaving space at the corners.
- Align the privacy filter with the screen and press it onto the adhesive strips.
- Ensure the filter is firmly attached and properly aligned.
How to Remove
Gently peel off and clean any glue residue using a soft screen wipe.
Tips for Optimizing Use
- Ideal for fixed-use tablets or POS devices.
- Ensure clean frame before application.
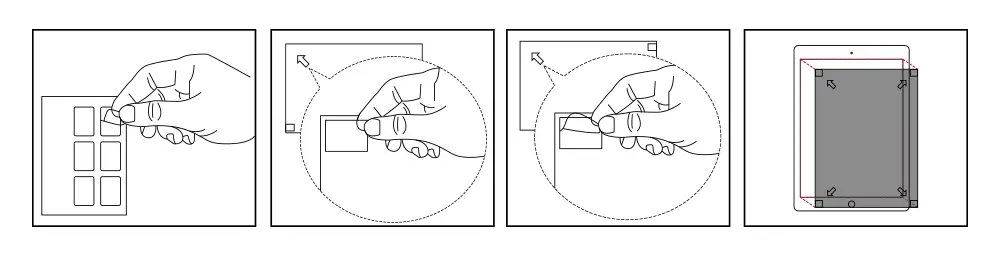
Suitable for: Tablets with magnetic bezels or frames (such as iPad Pro with magnetic sides)
Installation Video
Please refer to the Magnetic Option in the Laptop Privacy Screen Installation section.
Step-by-Step Installation
- Wipe the tablet screen with the included microfiber cloth.
- Remove the magnetic privacy filter from its sleeve.
- Align the filter with the edges of the tablet screen.
- Gently place the filter over the display; it will magnetically attach.
- Confirm that the filter is securely attached and adjust if necessary.
How to Remove
Lift gently from the edge and remove. Store flat in a dust-free case.
Tips for Optimizing Use
- Best suited for iPads and other tablets with magnetic bezels.
- Excellent for users who need to share or switch screens often.
Common Installation Issues & Troubleshooting
- Air bubbles after installation: Use a microfiber cloth or card to push bubbles outward to the edge.
- Protector misalignment: Gently lift and re-align from one side. Avoid touching the adhesive.
- Edge lift or detachment: Ensure screen surface is completely clean and dry. Reapply pressure.
- Unsure which installation type to use: Refer to our comparison table below based on your device, usage, and material preference.
How to Clean a Privacy Screen Protector Properly?
- Use a clean, dry microfiber cloth for regular cleaning.
- Do not use alcohol, ammonia-based, or abrasive cleaners.
- Avoid excessive moisture near adhesive areas or nano frames.
- Store flat when not in use to prevent warping or dust buildup.
Performance Optimization Tips
- Adjust your screen brightness and contrast after installing the privacy filter.
- Use anti-glare settings or dark mode for better readability.
- Check touchscreen sensitivity settings, especially when using PET-based or glue-based films.
Frequently Asked Questions (FAQs)
- Can I reuse a privacy screen protector? Yes — magnetic and insert-type models are reusable.
- Does it reduce screen brightness? Slightly, depending on the material. Adjust brightness settings as needed.
- Will it affect touchscreen sensitivity? Some adhesive types may slightly reduce responsiveness.
- Is it compatible with camera covers? Yes, as long as there’s no overlap or obstruction.
- What type is best for frequent removal? Magnetic and insert types are ideal.
- How do I know if it’s installed correctly? No bubbles, centered alignment, and clean edges.
- Is it safe for the eyes? Yes — many models block blue light and reduce glare.
Comparison of Installation Methods
| Installation Type | Material | Device Compatibility | Reusable | Requirements |
|---|---|---|---|---|
| Magnetic | PET | Laptop, Tablet (with magnetic frame) | ✅ | Device must have magnetic bezel |
| Adhesive Strips | PET | Laptop, Monitor, Tablet | ❌ | Clean bezel or frame required |
| Insert Type | PET | Laptop, Monitor | ✅ | 3mm+ bezel required (slightly raised over screen) |
| Hanger Type | Acrylic | Laptop, Monitor | ✅ | Frame support on top edge |
| Self-Adhesive | PET / TPU | Tablet, Laptop | ❌ | Flat screen surface, one-time install |
| Nano Frame Glue | PET | Tablet, Laptop | ❌ | Edge frame adhesion only |
Contact & Support
Need help with product selection or bulk purchase quotes?
- Email: sales@reedee.com
- Live Chat: Available Mon–Fri, 9am–6pm, China Standard Time (CST, UTC+8)
Looking for OEM or Bulk Purchase Solutions?
We offer tailored privacy filter solutions for enterprise IT teams, retailers, and distributors. Request free samples or get a custom quote today.


Das ist einfach großartig umfangreich und für jeden Nutzer eine echte Hilfe, fast wissenschaftlich von der Aufteilung/Gliederung her. Danke vielmals für Ihre wunderbare Arbeit.
Es freut uns sehr, dass Ihnen der Inhalt gefällt und Ihnen wirklich weiterhilft. Ihre Rückmeldung bedeutet uns viel.